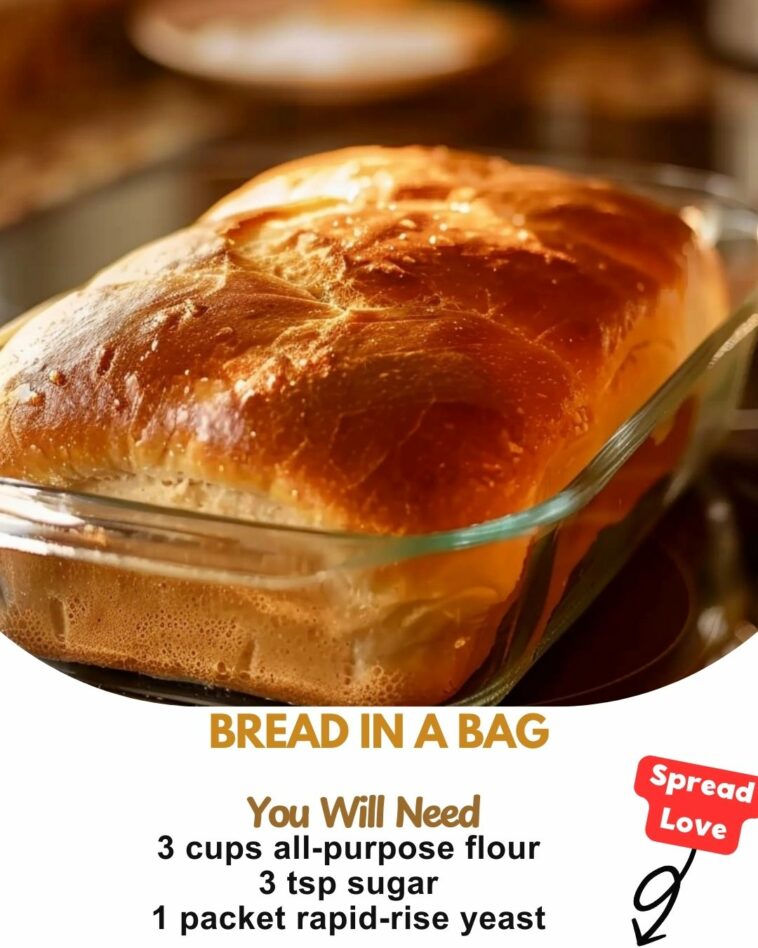
This ingenious Bread in a Bag recipe transforms the traditional bread-making process into a fun, mess-free adventure perfect for bakers of all ages and skill levels. By using a plastic ziplock bag as your mixing bowl, you’ll create a delicious loaf of homemade bread while eliminating counter mess and complicated techniques. The method is particularly wonderful for involving children in the kitchen, offering them a hands-on experience with measuring, mixing, and observing the science of baking. The result is a beautifully textured loaf with a golden crust and soft interior that proves homemade bread doesn’t have to be intimidating or time-consuming.
Bread in a Bag: A Fun Baking Adventure for All Ages
There’s something magical about the aroma of freshly baked bread filling your home – a scent that evokes comfort, warmth, and togetherness. Yet many of us shy away from bread-making, intimidated by the seemingly complex process of kneading, proofing, and baking. This is where Bread in a Bag revolutionizes home baking by transforming what can feel like a daunting culinary challenge into an accessible, enjoyable activity for everyone.
The beauty of this recipe lies in its remarkable simplicity. By using a resealable plastic bag as your mixing bowl, you eliminate much of the mess typically associated with bread making. No flour-dusted countertops to clean, no sticky dough stuck to your hands – just a self-contained environment where all the magic happens. This approach makes bread baking surprisingly approachable, even for those who’ve never attempted homemade bread before.
Why You Should Try This Easy Homemade Bread Recipe
Perhaps the most compelling reason to try Bread in a Bag is its extraordinary educational value for children. This recipe turns baking into a hands-on science experiment and culinary lesson rolled into one. Kids can witness the fascinating process of yeast activation, learn about measurements and proportions, and experience the satisfaction of creating something delicious from basic ingredients. Their eyes light up as they squish and mix the ingredients in the bag, watching the transformation from separate components to cohesive dough.
Beyond its practicality, this method produces genuinely delicious results. The bread emerges from the oven with a golden crust and tender crumb that rivals more complicated recipes. There’s nothing quite like slicing into a still-warm loaf that you’ve created with your own hands – a simple pleasure that connects us to generations of bakers before us.
In our fast-paced world where convenience often trumps quality, Bread in a Bag offers the best of both worlds. It’s a reminder that homemade doesn’t have to mean complicated, and that creating something from scratch can be both efficient and joyful. Whether you’re a busy parent looking for a rainy-day activity, a teacher seeking a classroom demonstration, or simply someone curious about bread-making, this recipe opens the door to the rewarding world of home baking in the most approachable way possible.
Storage Options
- Room Temperature: Store completely cooled bread in a bread box or airtight container at room temperature for up to 3 days.
- Refrigeration: While refrigeration can extend shelf life to 5-7 days, it may accelerate staling. If refrigerating, seal tightly in plastic wrap or an airtight container.
- Freezing: For longer storage, freeze the whole loaf or pre-sliced portions for up to 3 months. Wrap tightly in plastic wrap, then aluminum foil or place in freezer bags.
- Reheating: Refresh room temperature bread in a 350°F oven for 5-10 minutes. For frozen bread, thaw at room temperature and warm in the oven, or toast slices directly from frozen.
Summary
Bread in a Bag is a simple, mess-free method for making homemade bread that’s perfect for beginners and children. This recipe uses a resealable plastic bag as the mixing vessel, eliminating countertop mess while teaching fundamental bread-making skills. The result is a versatile white loaf with a golden crust and soft interior. Total preparation and baking time is approximately 2-3 hours (including rising), with active hands-on time of only about 20 minutes. The recipe yields one standard loaf (about 12 slices) and requires no special equipment beyond basic kitchen tools and a loaf pan.
Equipment
- 1 gallon-sized resealable plastic bag
- Measuring cups and spoons
- 8½ × 4½-inch loaf pan
- Cooking spray or butter for greasing
- Kitchen scissors
- Clean kitchen towel
- Oven
- Cooling rack
- Optional: food thermometer
Ingredients
- 3 cups all-purpose flour, divided
- 3 tablespoons granulated sugar
- 1 package (2¼ teaspoons) active dry yeast
- 1 teaspoon salt
- 3 tablespoons vegetable oil or melted butter
- 1 cup warm water (120-130°F)
- Optional: 1 tablespoon butter, melted (for brushing on top)
Instructions
- Prepare the yeast mixture: In the gallon-sized resealable bag, add 1 cup of flour, sugar, yeast, and warm water. Seal the bag tightly, removing as much air as possible.
- Mix the ingredients: Gently squeeze and knead the bag with your hands until all ingredients are well combined. This creates your yeast mixture.
- Let the yeast activate: Place the sealed bag in a warm spot and let it rest for 10 minutes. The mixture should become bubbly, indicating the yeast is active.
- Add remaining ingredients: Open the bag and add another 1 cup of flour, salt, and oil or melted butter. Reseal the bag and mix thoroughly by squeezing and kneading the bag.
- Add final flour: Add the remaining 1 cup of flour to the bag. Seal and mix until a cohesive dough forms that pulls away from the sides of the bag.
- Remove dough from bag: Lightly flour a clean surface. Using scissors, cut one bottom corner of the bag and squeeze the dough onto the floured surface.
- Knead the dough: Knead the dough for about 5 minutes until smooth and elastic. Add small amounts of flour if the dough is too sticky.
- First rise: Shape the dough into a ball and place in a greased bowl. Cover with a clean kitchen towel and let rise in a warm place for about 30-45 minutes, or until doubled in size.
- Prepare for baking: Grease the loaf pan. After the dough has doubled, punch it down gently to release air bubbles.
- Shape the loaf: On a lightly floured surface, shape the dough into a loaf and place it in the greased pan.
- Second rise: Cover the pan with the kitchen towel and let rise again for about 30 minutes, until the dough rises just above the rim of the pan.
- Bake the bread: Preheat oven to 375°F while the dough is on its second rise. Bake for 25-30 minutes until the bread is golden brown and sounds hollow when tapped on the bottom. For more accuracy, internal temperature should reach 190°F.
- Cool and serve: If desired, brush the top with melted butter for extra flavor and softness. Remove the loaf from the pan and cool on a wire rack for at least 20 minutes before slicing.
Notes
- The water temperature is crucial for proper yeast activation – too cold and the yeast won’t activate, too hot and it will kill the yeast.
- Rising times may vary depending on the room temperature; in cooler environments, it may take longer.
- This basic recipe can be customized with various add-ins like herbs, cheese, or garlic (see variations).
- Using bread flour instead of all-purpose flour will produce a chewier loaf with more structure.
- The bread freezes exceptionally well, making it perfect for batch preparation.
Tips for Success
- Temperature matters: Ensure your water is between 120-130°F; use a thermometer if you’re uncertain. The warm water activates the yeast without killing it.
- Visual cues: Your first mix should bubble and expand – if it doesn’t, your yeast may be inactive and you should start over with fresh yeast.
- Kneading technique: When kneading by hand, push the dough away with the heel of your hand, fold it back toward you, give it a quarter turn, and repeat. The dough is ready when it springs back when lightly pressed.
- Rising environment: Create an ideal rising environment by placing the covered dough in a turned-off oven with a pan of hot water on the rack below.
- Avoiding bag breakage: Be gentle when mixing in the bag to prevent tears. If the bag does tear, simply transfer the contents to a new bag and continue.
- Testing for doneness: Besides the golden color, properly baked bread will sound hollow when tapped on the bottom and register around 190°F internally with a food thermometer.
- Cooling patience: Resist the temptation to slice the bread while hot – cooling allows the structure to set properly, preventing a gummy texture.
Additional Tips and Variations
- Whole Wheat Variation: Replace 1 cup of all-purpose flour with whole wheat flour for added nutrition and a nuttier flavor.
- Herb Bread: Add 1-2 tablespoons of dried herbs like rosemary, thyme, or Italian seasoning blend to the dry ingredients.
- Garlic Bread Base: Add 2-3 minced garlic cloves or 1 teaspoon garlic powder to the flour mixture.
- Cheesy Loaf: Fold in 1 cup of shredded cheddar, mozzarella, or Parmesan cheese before the first rise.
- Cinnamon-Raisin Bread: Add 1 tablespoon cinnamon and ¾ cup raisins to the dough, and increase sugar to 5 tablespoons.
- Dinner Rolls: Instead of forming a loaf, divide the dough into 12 equal portions after the first rise. Shape into balls and place in a greased baking dish. Reduce baking time to 15-20 minutes.
- Pizza Dough: After the first rise, use the dough as pizza base. Stretch onto a baking sheet, add toppings, and bake at 425°F for 12-15 minutes.
- Focaccia Style: After the first rise, press the dough into an oiled baking sheet. Create dimples with your fingertips, drizzle with olive oil and sprinkle with coarse salt before baking.
- Mini Loaves: Divide the dough between two smaller loaf pans for mini loaves, adjusting baking time to about 20 minutes.
Frequently Asked Questions (FAQ)
Q: Can I use instant yeast instead of active dry yeast? A: Yes! Use the same amount but you can skip the initial 10-minute activation step and add all dry ingredients together.
Q: Why didn’t my dough rise? A: Several factors could cause this: inactive yeast (check expiration date), water temperature incorrect (too hot kills yeast, too cold doesn’t activate it), or environment too cold for rising.
Q: Can I make this recipe dairy-free? A: Absolutely! Use vegetable oil instead of butter, and the recipe remains completely dairy-free.
Q: How can I make a softer crust? A: Brush the top with butter right after baking and cover the cooling loaf with a clean kitchen towel to trap some steam.
Q: Can I use this method with gluten-free flour? A: While possible, gluten-free bread requires different ratios and often additional ingredients like xanthan gum. A specific gluten-free bread recipe would work better.
Q: My dough is too sticky to handle. What should I do? A: Add flour a tablespoon at a time during kneading until it reaches a manageable consistency. Be careful not to add too much, which can make the bread dense.
Q: Can I mix in a stand mixer instead of a bag? A: Absolutely! While you’ll lose the “bread in a bag” novelty, the ingredients work perfectly with standard mixing methods.
Q: How can I tell if my bread is fully baked? A: The bread should be golden brown, sound hollow when tapped on the bottom, and ideally register 190°F on an instant-read thermometer inserted into the center.
Conclusion
Bread in a Bag represents so much more than just a clever kitchen hack – it’s a gateway to the rewarding world of homemade bread for countless people who might otherwise never attempt it. The simplicity of the method belies the quality of the result: a delicious, wholesome loaf that carries all the satisfaction of traditional bread-making without the intimidation factor.
What makes this recipe truly special is its versatility. Once you’ve mastered the basic technique, the variations are endless. From sweet cinnamon-raisin for breakfast to herb-infused loaves for dinner, this foundational recipe adapts to countless culinary needs. The fact that it freezes beautifully means you can always have homemade bread at the ready.
Beyond the practical benefits, Bread in a Bag creates opportunities for connection. When children participate in the process, they gain confidence in the kitchen while learning fundamental cooking principles. Teachers use it as an engaging classroom demonstration of science concepts. Families create memories while preparing it together.
In our world of convenience foods and instant gratification, taking the time to create something as elemental as bread offers a moment of mindfulness – a chance to slow down and engage with a process that humans have performed for thousands of years. The fact that this particular method makes it accessible to almost anyone is what makes Bread in a Bag not just a recipe, but a valuable addition to your culinary repertoire. So gather your ingredients, grab a plastic bag, and discover the simple joy of creating something truly fundamental with your own hands.