Anyway, the process is simple.
Supplies list: (many of these items you may already own, keeping costs down)
Clear Tarps ($10)
Duct Tape ($5)
Blue Painter’s tape ($5)
Handheld pump sprayer ($15)
Bucket, Sponge and Soap ($15)
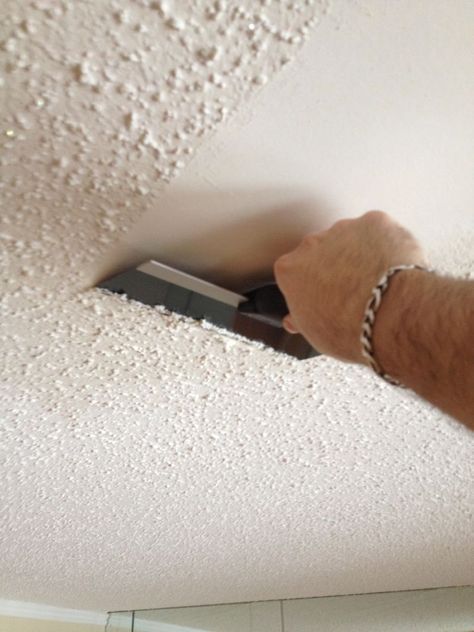
10″ Scraper ($7)
Silicone Caulk – ($4)
Stepstool ($25?)
Paint Pole, Roller, and Roller Covers ($15)
Ceiling Paint ($15 / gallon)
Spackle / Joint Compound ($5)
Sandpaper ($5)
Mask / Respirator ($15)
Joint Tape ($3)
Instructions:
1) Strip room of everything you can move. Certain sofas, tv stands, or heavy furniture are better off left where they sit, but all lamps etc. can go. It’s much easier to get to all corners with big things missing.
2) Tarp the entire room. Tape tarps together – ALL SEAMS- with duct tape, and use the painter’s tape to go at least a foot up the walls. Cover all electrical outlets and air registers, essentially creating a bowl-shape for the plaster to fall in to. Some people like to tarp the ENTIRE walls, but if you go slow, not much will glop onto them. It’s easy to clean up later anyway. The smallest seam between tarps will inadvertently cover the entire room in plaster dust.
2) Use the water sprayer to moisten a 5×5 foot box shape. You can spray the whole room if you want, but this stuff absorbs a ridiculous amount of water, so be aware before you begin. It’s hard to describe when it’s wet enough – but your scraper will slide through the “oatmeal” easily without leaving the Sheetrock very wet behind it. You can use paper towels to dry the Sheetrock if it’s really wet, and be sure to spray the popcorn directly. If you have many drips falling from the ceiling, it’s more than wet enough. You can honestly use your fingernails to test! Wear a mask and eye protection, even if you’re asbestos free. This stuff tastes like glue.
3) Use a file to smooth and curve the edges of your scraper so you don’t gauge the Sheetrock above the popcorn. This step isn’t necessary, but I’m glad I did! You could use a smaller (or larger) width scraper, but the 10″ was perfect for our application.
4) Get up on your stool and scrape away! Hold the scraper at a very low angle – almost parallel with the ceiling. The more angle, the more gouges you’ll risk. Push firmly, but if it fights you, add more water. Water is your friend! You can also use a paint roller dipped in warm water to apply if you don’t have a pump sprayer. You CAN scrape dry popcorn, but it’s a lot more work.
5) Be sure to keep all the oatmeal on your tarps, but be warned – it will be MESSY and SLIPPERY. I wore “crocs” type shoes to keep from stepping in it directly, and they’re easy to wash off. As the wet oatmeal dries, it turns back into a powder, which will get everywhere. Be sure to double tape your tarp seams.
6) Use a smaller putty knife to get the edges. If your room has molding, scrape against it. If not molding exists, scrape close, then use the sandpaper to get the edges. You may need a gritty sandpaper to get it done. Remember: water is your friend!
7) Bundle all tarps into themselves, overlapping, to keep major chunks from falling out. We did a poor job taping the seams, so dust and chunks got everywhere. On treated hardwood floors, a warm water bucket with citrus cleaner will do a nice job, and a shop-vacuum (wet / dry vac) gets the dust. It’s a good reason to move the furniture and clean behind!
8) Check for any repairs. We didn’t have much major repairs, but Spackle easily fills in the holes. Wait for it to dry, sand it flat and prime/paint over it. Use the sandpaper to smooth out any missed plaster or adhesive. Remember your mask and goggles… Use a damp (not wet) sponge and paper towels to wipe the ceilings smooth. Paint will not adhere to loose drywall dust!
9) Prime and Paint – Apply fresh tarps, no need to tape unless you feel so inclined. You may need 1/2 coats of primer if you’re painting plain stamped drywall, or if you’re using any other color other than white. I used the primer that was already applied, and put two heavy coats of ceiling paint on top. The paint roller pole was a little difficult to get used to, but applying a lot of pressure made the process go quickly. Wait for the coat to dry completely before “touching up” any areas. Ceiling paint is usually flat, and wet spots will look a bit awkward until it fully dries.
10) You may want to use a silicone caulk to clean up the edges where the ceiling meets the walls. In our application, our walls are actually painted-over wallpaper, so the edges were very rough. They may have applied an adhesive to the edges to keep the wet popcorn from peeling the paper during installation.
11) Throw away all tarps, examine progress for touch-ups, missed spots etc.
12) Clean and replace! Use the water bucket and mop, as well as a vaccum and dusting rag to give your rooms a really good clean. If you get plaster on carpet, use it as a reason to rip up all the carpet! 😀 You may have to vaccuum 47 times, wipe the glass 12 times and mop 125 times, but in the end it’s worth it. The hard part is over now.
13) If you’re replacing fixtures, fans etc, remember to remove the old ones first. Turn off the electricity at the circuit breaker and flip the wall switch off for extra insurance. If you’re not comfortable with the wiring, seek professional assistance. Do not spray this plaster with water, just grab some gritty sandpaper and get it done. No water should come anywhere near electrics, even with it shut off at the circuit breaker.
And that’s it! Obviously, tall or angled ceiling would be more difficult but for the cost, it’s a great thing to try yourself.
You’ll notice a LOT more light in each room, now that the millions of tiny shadows are gone, and you’ll insist your ceilings are a foot taller than they used to be.
Total times for 2 rooms and a hallway:
Wet, Scrape, Spackle = 2 Hours
Prime / Paint = 2-3 Hours
Cleanup / Replace = 2 Hours
Good luck and have fun! Be sure to blast music and invite friends over to help. It may not be perfect, but our motto became ‘anything’s better than popcorn!” and for us, that’s true. 😀
To Keep Reading Please Head On Over To Next Page Or Open button (>) and don’t forget to SHARE with your Facebook friends