Yes, that says Plywood Plank Floors! – Trust me, it’s easier than you may think! We did this in a bedroom! – People think they look like high-end expensive floors… However, we have discovered since then that it would be cheaper to do tongue and groove 3/4″ pine (the back side of wainscoting, which is the flat side, would be up – we plan to do the rest of our home with this). I’d say the bedroom, which is pretty good size, cost us about $225 total – including the lumber yard cutting the planks for us from the plywood sheets, the oil base stain and oil base satin finish polyurethane – we were advised to use oil base products for durability by a professional builder/remodeler friend, and the pine plywood seems to have a very hard surface. Because of squeaky floors, we put down sub-flooring first and then glued the back side of the planks with Liquid Nails, as well as used a pneumatic nail gun (note that we used large nail heads). We love the rustic old look it has! Perhaps someone can shed more light on the tongue and groove flooring idea. It makes sense cost-wise for us to do, and we have about 2,000 sq. ft. to cover yet! People online talk about using cheap finished 1 side plywood – we did a LOT of looking around our area (Western NY), and did not find anybody that carried anything like that.

Getting a good start!

Almost there! – and this went very quick with 2 people! – Maybe about 2 hours! I measured, he cut and applied the Liquid Nails, I placed the planks and used the Nail Gun! 🙂
Click ‘Next Page (>)’ to keep reading and don’t forget to SHARE with your Facebook friends

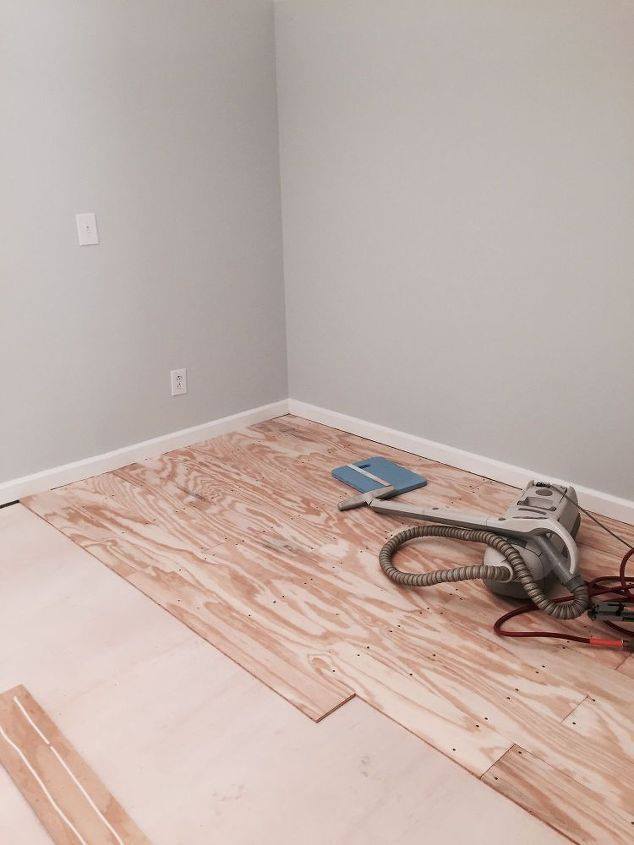
Ready for sanding! Literally sat on my butt and used a palm sander, which is quite user friendly. We might try sanding before install next time, but it seems that all the “real” hardwood floor folks install then sand…

Stain before some more sanding! – This time, I did the sanding by hand (before applying the polyurethane) to have more control of the color. With the plywood planks (pine – finished one side), it sure soaked up the color! – Made me glad we chose a darker color stain!

After sitting on my butt, scooting around the room sanding by hand, to get the desired look . / I’m sorry I don’t have pix of the finished room without furniture, etc. in it – but trust me, it’s beautiful! – everyone’s impressed!!!
Click ‘Next Page (>)’ to keep reading and don’t forget to SHARE with your Facebook friends

Here we are with some furniture in the room – this is used as a guest room and for our new grandbaby when she is with us!

This gives you a good idea of the satin finish. It looks rich! – I, personally, am not in love with shiny wood floors, so this is our desired look. All in all, we would say this was a fairly easy project – started very early on a Saturday morning – did the cutting of the planks and install on Saturday, as well as sanding and applying the stain. Sunday, was light hand sanding and touch up stain where I thought it was needed – waited for it to dry – and applied the first coat of polyurethane before bed. Monday, got up early and applied the second coat before we took off for the week! Would DEFINITELY do this again!! – only with the 3/4″ tongue and groove pine – flat side up!!!!! – just because of the cost factor … unless someone out there can tell us where to find that CHEAP finished one side plywood!!